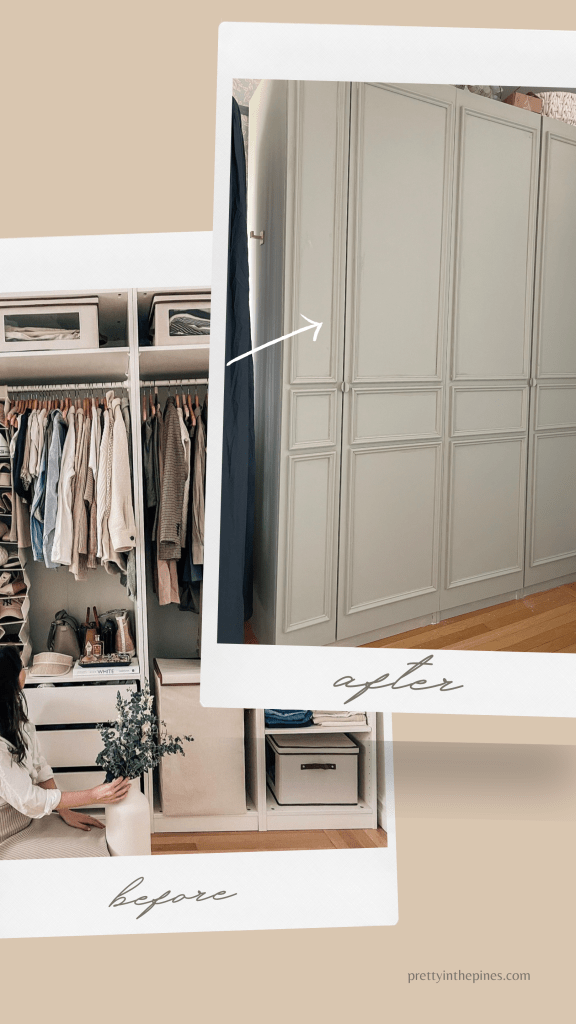
When we moved from North Carolina to New York back in February of 2020 (can’t believe it’s been almost two years), I was willing to give up many things in order to spend more time with TJ (at the time, he was traveling here weekly for work) and that included selling our house which also meant no longer living with walk-in closets. Walk-in closets in NYC are hard to come by… turns out a lot of things are hard to come by here BUT, thankfully, IKEA came through and I decided to put one of their PAX wardrobe systems along one of the bedroom walls to give me some extra closet space. I never once missed my walk-in closet.
At the time, I just needed something quick and deliverable. I settled on this wardrobe layout because it was in stock and could be delivered quickly but decided to do the open-closet look without doors. I loved it but fast forward two years and our family has grown but our space has not! The only spot this IKEA closet could fit was in our second bedroom AKA the forever-in-progress-soon-to-be nursery. I wanted the room to feel like an intentional nursery despite it’s multiple functions. That meant it was time to hide my clothes and buy doors for the closet. I recently purchased 3 of these doors and 1 of these along with these handles. The doors I purchased had literally NO details… just a flat white tall rectangle. Figuring out what doors to buy was half the battle. We had experience adding moulding to various walls in our home so we decided to create a layout of moulding for the doors to make it less plain and boring.
Once all of the doors arrived, I picked out a paint color and picked up some primer. We have an embarrassing amount of paint cans in our apartment and for some reason I had an unopened can of Farrow and Ball paint. I think I was going to use it for a previous project but it turned out to be the perfect color for the nursery. You can read more about the nursery colors here.
Now that we had the doors and the paint ready to go, the most important first step was to PRIME. We needed to prime the Ikea doors REALLY well because of the material they are made of. Look for a primer specifically mentioning it works for laminate! We did NOT sand our doors at all but if you wanted to roughen the surface a little, it probably wouldn’t hurt. But, I just had a baby so if I can save some time (and keep our air a little cleaner), that’s what I’d like to do! We used Sherwin Williams Extreme Bond Primer but I’ve also heard great things about this primer working REALLY well for IKEA furniture.
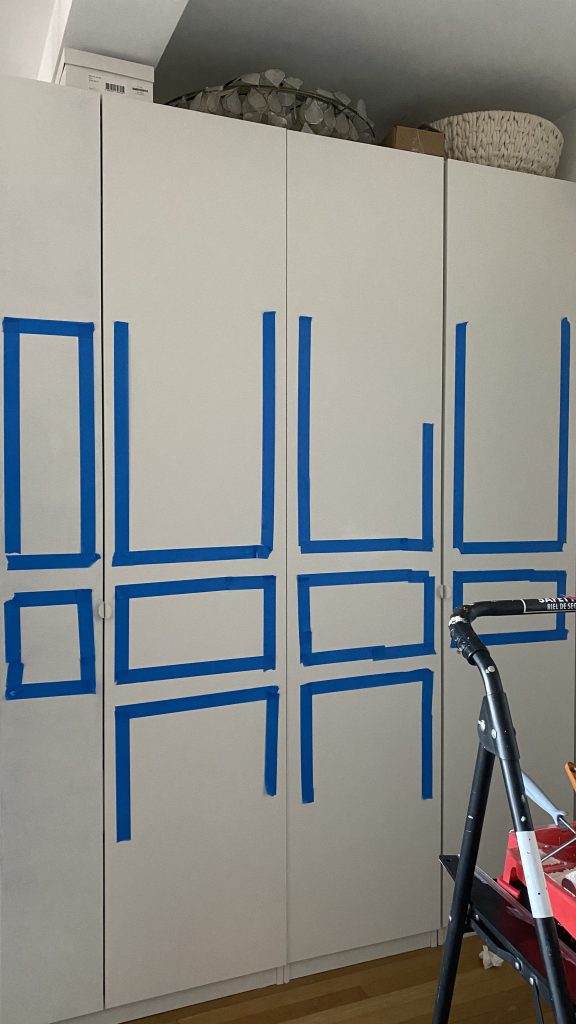
*If you are planning to add some sort of moulding design onto the doors, I would try and decide on the layout and take measurements BEFORE priming and painting. I always do this with painters tape as shown below:
We let the primer settle overnight and then next day we started the paint the first coat. Once painted, it was time to add the moulding/trim design. If you’re new to doing this… you basically need:
- saw with box/mitre box
- wood or polyurethane moulding (Personally, I like between 1-2 inches wide with a few “grooves” and ridges… not sure of the technical term)
- double-sided mounting tape (you may also want some back-up type of glue incase your tape has trouble sticking to the trim… we just used a hot glue gun for a few spots)
- caulk
- level or laser level
For the trim, I always go to a local lumber store… Mike’s Lumber on W. 88th St./West End Ave. But I will link some options below too if you’d rather just order online. You can use regular wood or polyurethane but I’ve only ever used wood.
[show_boutique_widget id="1118953"]For the layout, I decided to have the trim sit one inch from the sides of the doors and 3 inches from the top and bottom. Simply cut the trim using the saw/box at a 45 degree angle with the measurements your specific layout/design calls for.

We applied the trim using double-sided mounting tape and caulk to fill the little side gaps as well as help secure it more to the doors.
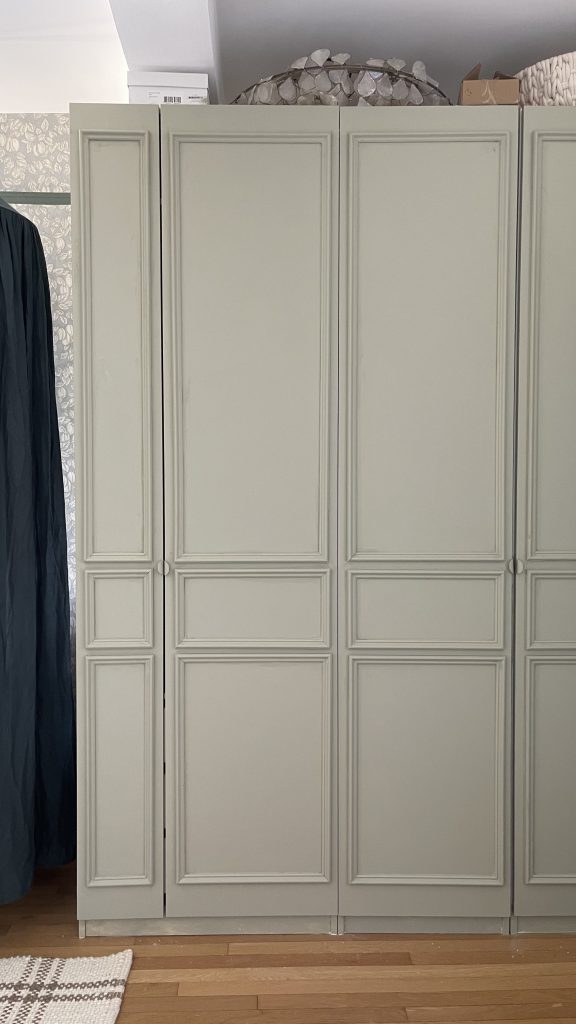
I have a few paint touch-ups left to do but, other than that, these closet doors are complete! Let me know if you have any questions that I might have missed.

Hi. Is it best to paint the cabinets before adding the molding, or could you add molding to unpainted cabinets and paint it all at once?
It looks great!
Thanks!
I think you could probably do either. We actually painted ours first and then decided to do the moulding. But I think you could probably be okay with just painting after the moulding is on.
Hey Shelby! Love how this turned out! How did you paint the bottom part of the cabinets while they were assembled?
Thanks, Brianna! My husband used a sheet of paper and slid it under the wardrobe (since it was a little too heavy to actually lift) and used that as a barrier from the paint. You could also use painter’s tape if you feel you could get it under far enough. There was definitely a little bit of paint on the floor, but we were able to get it up before any damage.